


A clay didjeridu? Are you joking?
![]()
![]()
![]()
Clay makes an excellent material for didjeridus (and many other musical instruments as well). Although fired clay is rigid, and even brittle, compared to other materials like wood, it is also very resonant and has some unique acoustical properties that work well for didjes. Picture, in your mind, a large, thin-walled ceramic bowl. Rap it solidly with your finger. Hear the beautiful ringing sound? Now imagine a long ceramic didjeridu-like tube, with a low drone pumping through it, and the whole instrument vibrating like that big resonant ceramic bowl. Exciting, isn't it?
There are many different types of clay from all over the world. Different clays have different colors and different firing characteristics, such as the temperature at which they "vitrify" or mature into a harder, denser form. Some common clays you might be familiar with are terra cotta, stoneware and porcelain. To make didjeridus, I use stoneware clay that is best suited to sculpting large forms, and fire it to "cone 10", which is about 2400 degrees fahrenheit. This produces a vitrified, hard, dense and durable instrument with excellent resonant qualities.
Didjeridus can be made from clay using several techniques. You can roll out a big slab of clay and then form it into a cone or wrap it around a stick to form a tube. You can roll out a thin snake of clay and gradually build up a long tube of any shape by coiling it around and around. My method makes use of a device called an extruder.
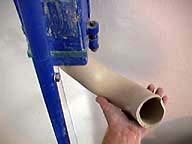
An extruder is like the Play-Doh(TM) "Fun Factory" that I used to play with as a kid. It squeezes out clay through a set of dies that form the clay into different shapes. The extruder I use is much larger than the Fun Factory, made of steel, and mounted on the wall. I use a set of extruder dies that create hollow tubes of clay.

It's not feasible to extrude an entire 4 to 6 foot long didjeridu in one piece unless you make a pretty straight one. Extruding long, complex twisted shapes is difficult because the clay is very soft and it tends to collapse when the extruded piece becomes large. I like making didjes with lots of curves, which means I need to extrude many short twisted pieces, and then attach them together later when they have partially dried and stiffened up.
I like making twisted and curved didjeridus for several reasons:
Most of the pieces I extrude look like variations of macaroni elbows. I like to extrude lots of pieces with different interesting shapes, and then later trim them and decide how to fit them together into different instruments. Once a piece is extruded, you can't bend it or change its shape. You have to coax it out of the extruder with exactly the curve you want it to have.
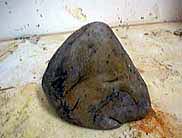 |
The materials: A heap of clay. |
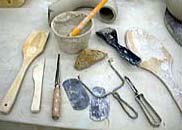 |
The tools: A ceramic extruder, wooden spoons and paddles, a knife, a cheese slicer, metal scrapers, and a potato peeler. |
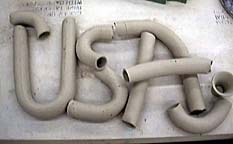
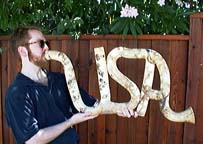
For this project, I have in mind that the didjeridu I make will spell out "USA", to be played on, and used on the cover of, Peter Spoecker's "Didgeridoo USA" recording project.
First, I plan out the basic shapes I will need and extrude them. I make a number of variations and extra pieces so I will have some artistic flexibility later. As the clay comes out of the extruder, it is trimmed with the cheese slicer to make the pieces you see below.
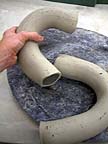
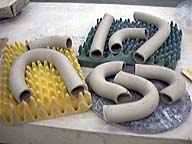
Once the pieces are extruded, I let them dry for several days to stiffen up. Then they can be trimmed with a knife and cheese slicer and laid out on the table. I manipulate them to decide which ones to use on the USA didj. The didjeridu's mouthpiece is made by shaping the clay with a wooden paddle and trimming with a potato peeler.
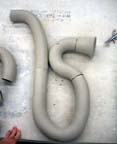
With the leftover pieces, I mess around with them until they are designed into a second didjeridu, which looks sort of like "US", and a set of tubular drums. Nothing left over!
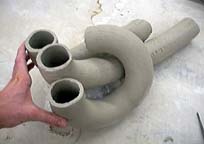
To attach the pieces together, I roughen the edges, slather them with slurry (liquid clay) and stick them together. It sounds sloppy, and it is! But later there is a lot of fine sculpting with tools (paddles, metal scrapers and potato peeler) to make the seams invisible.
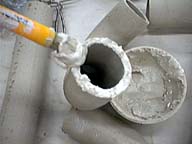
The pieces are joined one at a time, with several days of controlled drying in between. Over two weeks pass before the entire didjeridu is assembled. It turns out that this didjeridu is too large to fit in the kiln, so I will have to fire it in two separate pieces, which will be joined together with epoxy putty after they are fired. But first, I attach the whole thing together to check the pitch. Wow, is it low! Sounds like an E or F. I decide to seal off unnecessary internal parts, like the second stem of the "U", to raise the pitch. After assembly, another four weeks of carefully controlled slow drying are necessary in order to ensure that it doesn't crack as it dries. Since the summer air in California is so hot and dry, a special room called a "damp room" with an industrial humidifier is used for the first stages of this slow-drying process.
When the didjdidjeridu is "bone dry" it is ready to be fired in the gas kiln. At the bone dry stage, it is incredibly brittle. It's nothing more than dried mud at this point, and must be handled with extreme caution or it will crumble to dust. The first firing is called the "bisque". The kiln temperature is very carefully and gradually increased to about 1800 degrees Fahrenheit. The didjeridu comes out white and still rather fragile. It reminds me of a very hard meringue.
Now I can coat it with a glaze or other materials. I decide to use some liquid clays called slips and engobes. These are hand-rubbed into the surface of the clay to bring out its natural surface textures. I'm anticipating that the final didjeridu will be painted, so any decoration I add at this point is just for fun.
The didjeridu goes into the kiln again, this time to be fired to 2400 degrees Fahrenheit. It comes out significantly smaller and denser than it started, and now has a much warmer color, due the the "reduction" firing in the gas kiln, where the flame was deprived of oxygen. Now it's a piece of stoneware pottery, with a density and properties somewhere between porcelain and stone. I attach the two pieces together, and now I can play it again. The pitch is slightly higher now, since firing has made the didj shrink. The timbre is bright and crispy for such a low didj.
![]() Click here to hear the USA didjeridu
Click here to hear the USA didjeridu
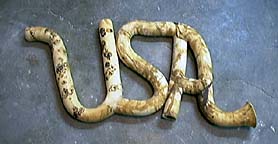
What about those leftover parts? Well, they turned into a second didjeridu (the "US" didj), and a set of tubular drums.


![]() Click
here to hear the "US" didjeridu
Click
here to hear the "US" didjeridu ![]() Click here to hear
the tubular drums
Click here to hear
the tubular drums
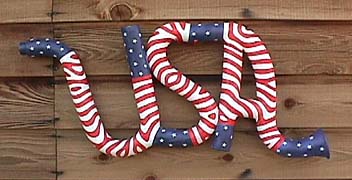
Peter Spoecker adds a stunning paint job to the USA didjeridu, to complete the patriotic effect. Fantastic job, Peter!
![]() Click here to hear the USA didge demo from the "Didgeridoo
USA" CD
Click here to hear the USA didge demo from the "Didgeridoo
USA" CD
There's no reason a didjeridu needs to be straight. I like working with clay because it lets me make a didjeridu in any shape I can imagine.To see more unusual ceramic musical instruments, please check out my book From Mud to Music and visit my virtual gallery at the Burnt Earth website.